


Installing commercial bike racks is an excellent way to make your building or location more accessible and appealing to cyclists. Retrofitting an existing space to add bike parking requires careful planning, but the benefits are numerous. By following key steps and considerations covered in this guide, you can successfully convert an underutilized outdoor or indoor area into secure and convenient bike storage.
Benefits of Adding Bike Racks
Installing outdoor bike racks offers numerous advantages that make retrofitting existing spaces worthwhile:
Improves Sustainability
Promoting cycling over automobile transportation is one of the most impactful steps an organization can take to reduce its overall carbon footprint and environmental impact. On average, a single commuter switching from driving to biking saves over 600 pounds of CO2 emissions annually. Installing bike racks signals to employees and the community your organization's commitment to sustainability and ethical operations. This also helps attract talent and customers who factor eco-friendly practices into buying decisions.
Promotes Active Transportation
Bike racks facilitate and encourage cycling as an active form of transportation. Enabling physical mobility alternatives to driving helps address public health issues like obesity, heart disease, and other conditions stemming from sedentary lifestyles. Making cycling more convenient and viable with bike parking solutions helps promote improved community well-being.
Appeals to the Cycling Community
Abundant and secure bike parking is one of the top priorities for cyclists in considering where to patronize, work, or study. Over 60% of people state they would bike more if adequate bike parking existed at destinations. It doesn't take much-enhanced security features to secure a bike; a well-maintained commercial bike rack can do the trick. Installing quality outdoor bike racks helps attract and retain cycling customers, employees, students, and visitors. Accommodating this segment makes good business sense and helps organizations adapt to demand.
Little Impact on Space
Outdoor bike racks allow the repurposing of dead zones and underutilized areas without losing valuable real estate or interfering with normal operations. The footprint needed is relatively small for bike parking compared to car parking for the capacity enabled. With creative placement, organizations can carve out bike stalls in formerly wasted niches like unused patios, corners of lots, wide hallways, etc. Indoor bike racks can also be an ideal solution for general communal spaces. The gains outweigh any spared space.
Assessing Your Location
Identifying the optimal placement for installing bike racks involves three key factors:
Measure Available Space
Consider the size and layout to determine what type of bike parking to install. Areas should accommodate ingress/egress paths. Factor an extra 18-24 inches per bike to allow room for maneuvering during inclement weather when wearing bulky coats or rain gear. Consider both indoor spaces and outdoor spaces when looking for the best place to implement bike parking.
Consider Visibility & Accessibility
Racks should be easily spotted and accessed from main entries without obstructing walkways or doors. Avoid hidden areas. Place near overhangs or consider weather-protective enclosures if exposing racks to heavy rain or snow accumulation. Bike lockers can be a solution for locations that have a rough climate.
Check Local Regulations
Most cities have codes and policies for bike parking. Review requirements and get permits, if necessary, before installation. Regulations sometimes specify minimum weather protection provisions.
Types of Bike Racks
Commercial bike racks come in a diverse range of stylesand configurations to suit different spaces and security needs. Consider these popular options when selecting a bike rack:
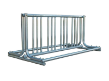
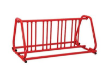
Loop Racks
Loop-style racks formed by bending pipe into a continuous U shape allow convenient locking of a bike wheel and frame with a user-provided U-lock or chain. These offer basic security and typically have a smaller footprint per bike capacity than other choices. However, tightly packed loops can make removing bikes tricky.
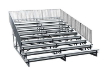
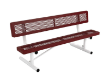
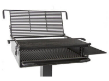
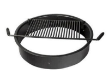
Grid Racks
Grid racks comprise a series of evenly spaced horizontal and vertical bars welded into an orderly matrix. The multiple anchoring points allow for securing bikes by the wheel or frame with standard locks. Grid racks maximize storage density, which efficiently uses space. Their tidy, aligned design also helps prevent handlebar tangling issues.
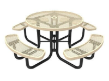
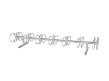
Circle Racks
As the name suggests, circle racks bend pipe into a ring shape with an open center space wide enough for a bike to insert. Users then lock the bike frame or wheel. The rounded perimeter provides ample room for accessing bikes without too much close density. Circle racks have a stylish, modern aesthetic.
Low-Profile Racks
Flat, on-ground racks positioning bike parking stalls at ground level offer unobtrusive bike storage that won’t block sightlines or encroach on vertical clearance limits. This makes them suitable for placement near transparency features like large windows. However, the awkward crouching access required to lift bikes in and out may frustrate some users.
Custom Racks
For locations wanting unique flair, custom bike racks come in artistic shapes with the ability to brand elements that traditional bike racks don't provide. However, specialty designs decrease bike parking density compared to more basic utilitarian options, so they may not suit bike parking-maximized retrofit scenarios. Custom racks also have significantly higher unit costs.
Still not sure which model is best for your space? Check out our Bike Rack Buying Guide.
Installation Process
Once you determine the ideal type and locations for bike racks, use this process for a smooth installation:
Equipment/Tools Needed
- Tape measure
- Stud finder
- Power drill
- Wrenches
- Level
- Concrete drill bits (if installing ground anchors)
- Personal protective equipment
Step-by-Step Instructions
- Mark dimensions for drilling based on rack specifications
- Identify attachment points to substrate (studs, solid anchoring surface)
- Drill pilot holes if attaching with hardware
- Attach racks with bolts/anchors based on the mounting surface
- Check racks are securely fastened and level
- Place safety caps on exposed threads/hardware
Safety Procedures
- Use caution drilling concrete and mounting over electrical lines/plumbing
- Wear safety glasses, gloves, and boots
- Follow manufacturer instructions
- Have another person assist with the lifting/mounting
- Check racks periodically post-installation to spot loose hardware
After Installing Bike Racks
Simply adding racks is the first step—you also need to promote awareness of the new bike parking solutions and maintain the infrastructure long-term:
Promote and Raise Awareness
Actively inform building occupants, neighboring community groups, and the wider public cycling audience about the availability of your new bike parking solutions. Send emails, post on bulletin boards, and reach out to local bicycle shops and cycling clubs. Designating the new facilities with visible wayfinding signage pointing to locations helps tremendously as well.
Consider hosting an opening event when unveiling the racks to publicize further. Events build buzz and show your commitment to cycling infrastructure.
Collect Feedback
Solicit input from cyclists on what aspects of the new bike parking solutions work well or what could be improved. Send out surveys, have comment cards available on-site, or directly engage bike owners at the location. This feedback will help gauge usage rates, perception, pain points, and reactions to different aspects like rack types, spacing, location, etc. Apply insights to enhance.
Make Adjustments
If certain rack sections go underutilized or theft/damage issues arise, make data-driven changes. Adjust layouts and density for optimization, add sought-after accessories like on-site bicycle repair stations or pumps, implement access control systems if security proves problematic, or amend policies based on user feedback.
Be proactive and nimble to ensure maximum ROI on the new cycling infrastructure. Make it as user-friendly and problem-free as possible.
Costs and Considerations
Properly budgeting for both initial and ongoing costs ensures the new bike racks for your business remain a valuable asset:
Equipment and Labor
Factor the cost of purchasing the racks, concrete anchors or subsurface mounts, tools like drill bits, wrenches, laser levels, etc. Depending on the complexity, outsourcing professional installation labor may be prudent. Experienced contractors ensure proper mounting and compliance with local codes and help troubleshoot surprises that can arise with retrofits. Obtain quotes from multiple vendors, as rack equipment and installation pricing can range dramatically based on styles and site specifics.
Maintenance
Completing proper maintenance on your bike rackwill require establishing cleaning routines to keep racks debris-free and tasks like snow removal during winter. Designate staff to periodically inspect racks, checking for damaged components like loose anchors, bent tubing, cracked welds, etc, along with addressing issues like graffiti. Develop checklists for maintenance procedures and logs to demonstrate duty of care. Neglecting maintenance risks injury, poor utilization, and shortened lifespan.
Conditions Inspections
Conduct thorough assessments at least twice annually to identify wear and tear requiring repair or proactive replacement of components reaching the end of functional life. Check anchors for loosening, inspect joints for metal fatigue, and ensure concrete footer integrity for ground-mounted racks. Being diligent avoids liability issues and ensures continuous safe usage, keeping your investment sound for years of service.
Retrofitting existing spaces to add bike racks brings flexibility in utilizing unused areas of land or interiors. With mindful placement, design selections, and proper installation, organizations can promote sustainability, serve the cycling community, and enhance spaces at minimal expense compared to benefits. This guide outlined actionable steps for executing successful bike parking solutions. Reach out for further project planning and implementation support.
Frequently Asked Questions (FAQs)
Adding the following commonly asked questions section pulls queries people often search when learning about retrofitting areas to enable bike parking:
How Much Space is Needed Per Bike Rack?
Ideally, have 30-inch spacing between racks depending on style to give room for accessing bikes. Space is also required for ingress/egress aside from just parking.
What Are Bike Rack Dimensions?
Dimensions differ widely, but upright racks average 32-36 inches tall. Footprint sizes range from 1 square foot per U-rack bike stall up to 8 feet for more elaborate corrals. Refer to manufacturer specs.
Do Racks Need to be Bolted Down?
Yes, securely anchoring with concrete footings or bolt attachments is vital both for preventing theft and liability in case of accidents if racks fall. Surface-mounted styles still require robust substrate fastening.
Where Should Bike Racks Go in Parking Lots/Garages?
Near main building access points for convenience, visibility, and avoiding lengthy walking distances. Grouped parking banks keep bicycles out of car circulation paths as well.


Leave your comment